Back to Manual Table of Contents
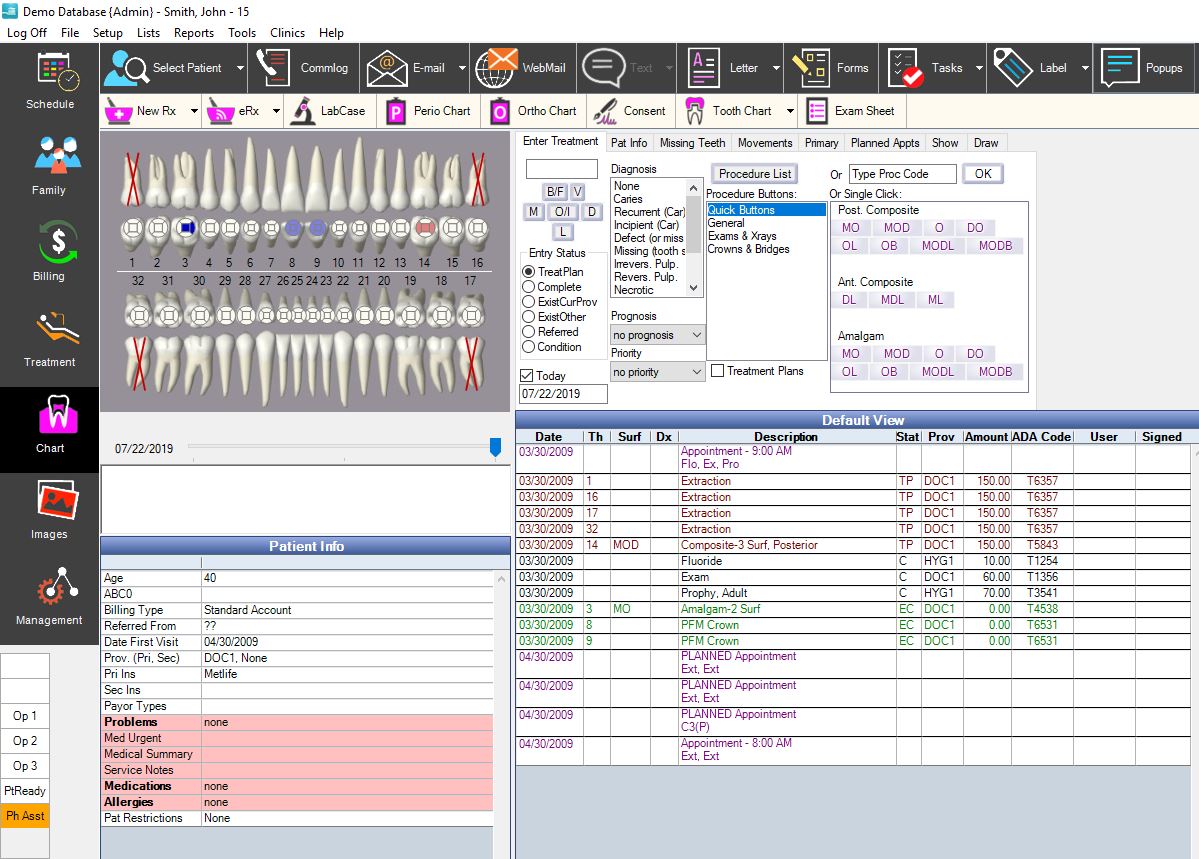
The Chart module is where the clinical information is entered and organized for a patient.
The Progress Notes are on the right, showing a list of all procedures treatment planned and completed. The treatment notes for each procedure are stored with the procedure and are visible here. At the top of the screen in the Show box, you can select which types of procedures are displayed and whether the procedure notes are displayed or hidden. Each procedure can be edited by double clicking on it, and there is more information in that section about the meanings of each of the statuses. As you can see, the items in the progress notes are color coded by status. The colors are completely user defined in the Definitions. Rx's are shown as line items in the progress notes along with their note, and their color is customizable as well.
Above the Progress Notes is a section for entering new treatment. The Enter Tx button directly above it is used to hide or display this section so that you can maximize the space available for the progress notes when not entering new treatment.
To the lower left is space for Medical and Service notes. These are freeform notes of current medical condition with unlimited space and scrollbars so that less important information can be placed towards the bottom where it might be hidden but is still very available.
The graphical tooth chart is displayed on the left side of the window, and is designed to show at a glance all treatement that has been performed or is planned for that patient. All the colors are customizable in the Definitions section, and the type of graphic that is drawn for each procedure is customizable in the Procedure Code setup.
The 'Planned Appointment' area is at the upper left. This appointment is created by the chairside assistant to be scheduled by the front desk based on finances, etc. See the Planned Appointment section for more details.
Entering Treatment
Treatment is usually entered by first selecting teeth in the tooth chart, holding down the control key for multiple teeth. Once the teeth are selected, you click on the surfaces, then diagnosis, and finally on a procedure. Depending on which teeth are selected, some surfaces will be disabled. When you click on the buttons for each surface, the surfaces box directly above them is updated. You can not edit this box.
There are three ways to select the actual procedure. You can select from the main Procedure list, or type in the code, or more commonly, single click on one of the procedure 'buttons' from the large box. The buttons are set up in the Procedure Buttons window, and are very flexible, letting you select procedure codes or Auto Codes. Usually, the treatment then goes directly into the Progress Notes, and displays on the tooth chart. If any information is missing, the edit procedure window will appear and allow you to fill in the missing information.
When you are selecting the teeth, you will often need to select primary teeth. To do so, you will first have to convert some of the permanent teeth on the chart into primary teeth. First select the teeth you wish to convert to primary. Then, from the top toolbar, click on the down arrow to the right of the Primary button, and select "Toggle Selected" to convert those teeth to primary on the chart. Your other two options from the dropdown list are Set All Primary, and Set All Permanent, neither of which would require selecting teeth beforehand.
See the section on Missing Teeth for information on how to enter existing missing teeth..
DentOffice comes with two special procedure codes for notes. Tooth Note lets you enter a note about a specific tooth, and Clinical Note lets you enter a general note. Any notes can go here, for instance a clinically related phone call, or notes about changes to medical history. You can always set up additional codes if you want more kinds of notes to be available, but take a look at the Comm Log first to see if that will work for your situation.
As you are entering procedures, the entry status, date, and priority will be set according to your selections at the lower left of the Enter Tx section. See the Procedure Edit section for an explanation of the different statuses. If you enter a procedure with a status of EO (Exising Other provider), the date will be 01/01/0001. This will make the procedure show at the beginning of the Progress Notes so that it doesn't cause clutter.
If the today box is checked, then the entry date will always be today's date. If you need to enter multiple procedures with a previous date, then uncheck the today box and enter the date before entering the procedures. Priorities are used in the Treatment Plan module. See that page for information on priorities.
For diagnosis, you can select one item from the list each time you enter a procedure, or you can skip it. The list is completely customizable in Definitions.
Images in Chart module
Images are imported or scanned in the Images module. But for radiographs and photos, it is nice to see them directly from the Chart module. So you can set some of you image categories to display in the Chart module as well. Organizing and naming image categories is done in the Definitions window. There are instructions there on how to mark certain categories with an X. Those categories will then show in the Chart module as tabs across the bottom. The height of the images section can be dragged taller or shorter, and you can minimize it by clicking on the current tab. The All tab will show all images for all tabs. Double click on an image to bring up that image full size in a second window. This second window can be dragged to another monitor if you use multiple monitors. You don't have to close this window to return to the Chart, so you can always leave it open.