Back to Manual Table of Contents
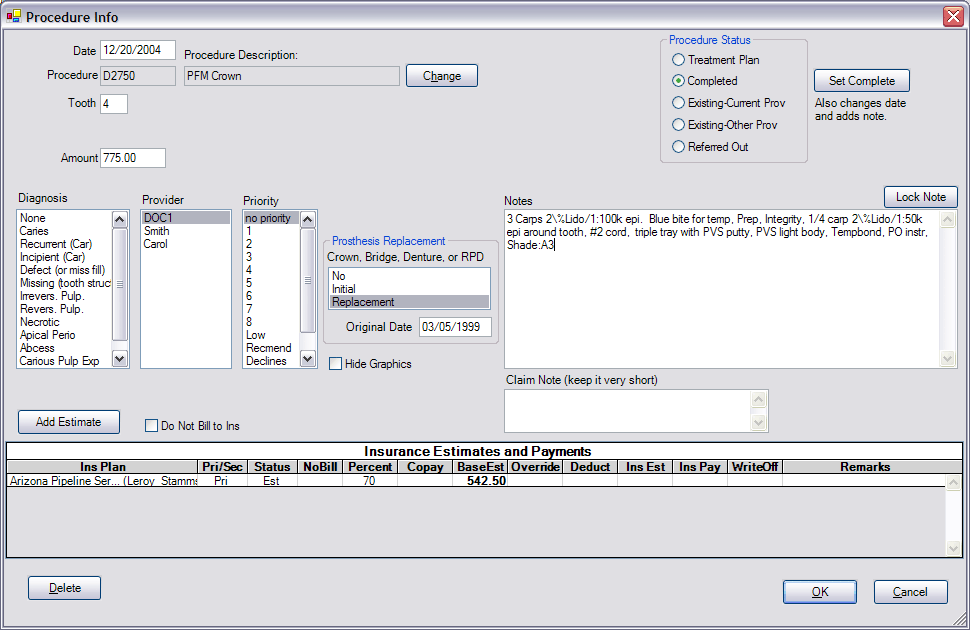
Procedures are entered from the Chart module, and you can also edit an existing procedure by double clicking it in the Account module, the Treatment Plan module, or the Chart module.

If you have already entered a procedure and need to change the Procedure Code, use the Change button. This also updates the fee. Guidelines for entering procedures that involve multiple appointments are in the Lab Case section.
Your options for tooth number and surfaces might be different depending on how the procedure code for that procedure is set up. For instance, you could also have tooth range, arch, sextant, or quadrant options. See Procedure Code setup for more details.
The procedure status can be one of the following:
TP - Treatment Plan - for work that is recommended, but not complete yet.
C - Complete - the fee for the procedure will show on the patient's account.
EC - Existing Current Prov - work that was done in your practice before you started using DentOffice.
EO - Existing Other Prov - work that was done by another provider, either before the patient came to your practice, or because they were referred out for treatment.
R - Referred Out - work that the patient needs done, but that will be done at another office. Once the work has been completed, you can change the status of the procedure to EO.
These statuses are used extensively throughout the program and the details are covered in the appropriate section.
You can select one diagnosis for a procedure. The items on this list are set up from the definitions area in the Tools module. If a procedure requires more than one diagnosis (for instance: cracked tooth, IP, Apical perio) you could add the additional diagnoses as notes in the procedure. One provider is selected from the list. The provider might be changed later when scheduling the appointment. Usually, the provider will already be selected based on the patient's provider. The priority is used to prioritize treatment in the Treatment Plan module.
The Prosthesis Replacement section in the middle will only be visible if the Procedure Code for this procedure has been set up ahead of time as a prosthesis procedure. This forces users to enter the needed prosthesis information before the Claim will be allowed to be Sent electronically.
The note area is usually empty until the procedure is marked complete, at which time the procedure note is entered. See the section on setting appointments complete for more information about procedure notes. Also, see the Notes Overview for information about notes in general. Based on your office policies, you have the option of locking the note. Once locked, the date it was locked will be displayed, and nobody can unlock it no matter what their Permissions. Some offices do this to create a legally tight chart record, but it is not required. Other offices find locked notes annoying and prefer instead to make weekly backup disks to create a historical record of the chart at previous points in time.
The claim note is for short notes that pertain to this procedure and should be sent with the claim. It should be used rarely. For now, the note does not carry over to the claim note for printed claims, but it is sent electronically with the individual procedure even though it is not obvious.
The Delete button to the lower left will delete this procedure. You would want to be very careful when doing this to make sure that you don't lose any clinical information and that the Account is accurate.
Insurance Estimates and Payments
This is a list of Claim Procs. See that section for detailed information. In essence, each row is either an estimate or has been attached to a Claim. Estimates are explained below, but if an procedure has been attached to a claim, then you have to edit the Claim Proc from within the Claim.
If you see items in the list with a status of Est, then you can safely edit or delete them since they have not yet been attached to a claim. Estimates are usually handled automatically by DentOffice, so if the estimate doesn't look right, or is missing, you should probably make sure the Insurance Plan is set up correctly instead of editing estimates manually. If you entered a treatment plan before entering the insurance plan, and the estimates still don't look correct, try clicking the Update Fees button in the Treatment Plan module.
But there are a few situations where you would manually edit an estimate. The first is if you don't want that procedure to be sent to insurance. Check the Do Not Bill to Ins box directly above the list of estimates. This automatically marks each estimate to not be sent to insurance. You could also accomplish the same thing by double clicking on the estimate and checking the Do Not Bill to Ins box within the Claim Proc, but doing it the first way saves a few clicks. Note that if this procedure is marked Do Not Bill to Ins in the Procedure Code window, then the box will be checked for you automatically when you create the procedure. The box can be unchecked in the future if you later decide to send the procedure to insurance.The second situation where you would manually edit an estimate is if you want to override the computed estimate. The insurance plan may be set up correctly, but you still need to change something. Maybe you got a pretreatment estimate back from insurance or you have a fee schedule to follow. Double click on the estimate and in the Claim Proc window, change Override Ins Estimate to the amount you want. You also have many other override options in that window, including overriding the percentage, the allowed amount, the copay, etc.