Back to Manual Table of Contents
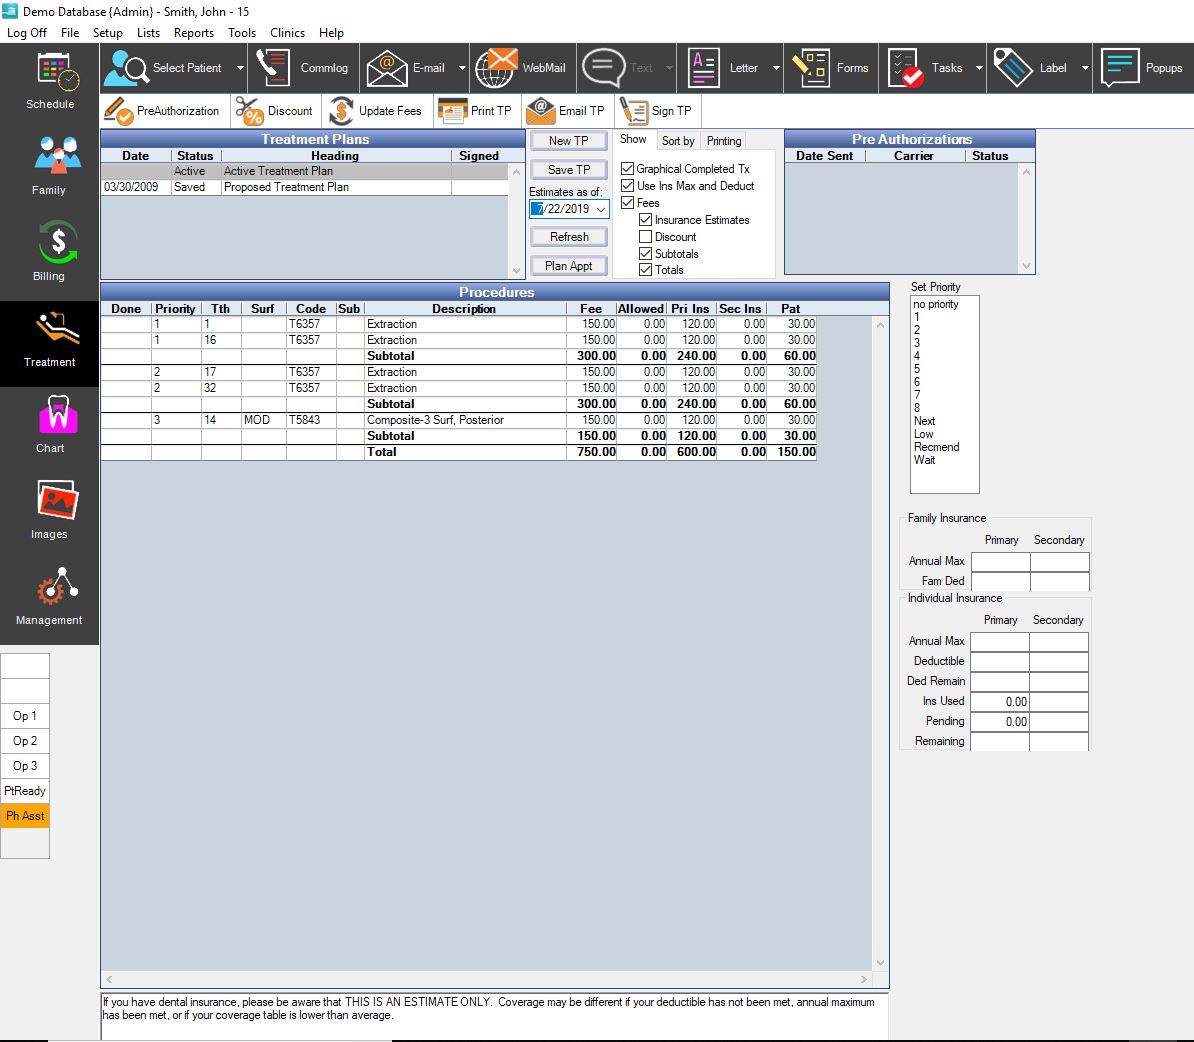
The treatment plan is a prioritized list of treatment that the patient needs. After entering needed treatment from the Chart module, you can move to this module to organize it for the patient.
There are two lists to the right under Priorities. Priorities are set up by the user in the Definitions area. Priorities can be numbers, letters, or words up to 7 characters. For the example above, a few common words were chosen, but it is entirely up to the individual office, and it has a lot to do with how you want to present it to the patient. As when setting up any Definition, the order of the priorities can be rearranged and priorities can be hidden. In this case, you also have the option of selecting a color for each priority. In the example a gray color was used for treatment that was probably not going to be done. Other descriptive words you might use would be Sched, Wait, Next, ?, Decline, Last, Low, High, NewYear, Urgent, WaitIns, Altern, Plan A, Plan B, RecPlan, AltPlan, etc. As you can see there are many ways of doing it.
Once you have your priorities set up in Definitions and you open this module, the two lists at the right will show the priorities you have set up. The Set list is used to assign priorities to the procedures on the treatment plan. Select any number of procedures, holding down the control key for multiple selections. Then click on an item in the Set list, and the priorities will be assigned and the order of the procedures on the list rearranged accordingly. You can also set priorities as you enter treatment in the Chart module and within the Procedure Edit window.
The Priority View list lets you selectively show only certain priorities. All items will initially be selected. You can click on individual items to change their viewing status, or you can use the 'All' or 'None' buttons below the list. There may be procedures with priorities that are not on the list. This can happen if you set priorities and then later hide those priorities from Definitions. By hiding them, they will no longer show as options on the lists, but they will still show properly in the treatment plan. They will be initially shown in the treatment plan with all the other procedures. The only way to not show them is to use the 'None' button to not show any procedures and then select the priorities from the View list that you do want to show. If you want to present two different treatment plans to a patient, the procedures on one plan should be assigned one priority, the procedures on the other plan a second priority, and any treatment that should show on both plans a third priority. Then, you set your View to show the priorities 1&3 and print the treatment plan. Change the view to show 2&3 and print the second treatment plan.
When you print the treatment plan, you have a few options on what shows. Check the completed treatment box to show completed treatment on the graphical chart in addition to the treatment planned treatment. Check the Insurance Estimates box to show insurance estimates on the treatment plan. You can also set defaults for both of these from the Practice setup page.
The area at the lower right is to view remaining insurance benefits. You can tell at a glance how much insurance has been used and how much of the treatment can be done before insurance runs out.
PreAuthorizations: The box at the lower right shows all Preathorizations for this patient. A preauthorization is exactly like an insurance claim, except that when it is sent, the date of service is left blank. The insurance company reviews the procedures sent and decides whether they are covered under the patient's contract. They will send back a form with an estimate of how much will be covered for each procedure. To create a new preauthorization, highlight one or more procedures, holding down the control key for multiple procedures. Then click the PreAuthorization button at the top. Click OK in theClaim Edit window as for any other claim. Then, you can print or send electronically from the Claim Send window. Single clicking on a preauthorization in the list causes all procedures attached to that preauthorization to be highlighted in the main list for easy viewing.
The update fees button in the toolbar is used when the fees for the procedures in the list are outdated. This can happen if you update your office fees, but you would normally wait until the treatment plan was six months old before updating the fees. The update fees button only updates fees for one patient at a time, and is designed to be used during the regular six month exam if there are still procedures present from the last exam which have not been completed. One other situation where you might need to use the update fees button would be if you change the insurance plan or the fee schedule for a patient after entering in all their fees. Then, to update the fees to the new fee schedule, you would click the update fees button.
The only way to currently archive treatment plans is to copy screenshots into the Images module. Click Alt-PrntScrn, then paste into the Images module. The resulting screenshot takes much less disk space than a scanned document. The Treatment Plan module is designed to show all information that is also on the printout, including the insurance disclaimer paragraph and the current date. You can archive multiple treatment plans if you print them out for the patient. You will need to refer back to the archived treatment plans when the patients dispute what you told them. It is strongly recommended to have strict policies and procedures in place to ensure that every time an exam is performed, a treatment plan is given to the patient.
To print the treatment plan, click the Print TP button. The printout will be similar to the following: