Back to Manual Table of Contents
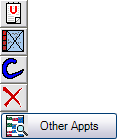
There are five 'action buttons' that can be used on an appointment. These buttons are on the right side of the Appointments module next to the confirmation list. The buttons will be gray until you single click on an appointment. Selecting an appointment is always the first step before selecting one of the buttons.
Unscheduled List
The first button sends the appointment to the Unscheduled list. See that section of the manual for more information.
Break
The second button is for breaking an appointment. Break vs. Move: It depends on your office policies, but generally an appointment is broken if the patient does not give 24 hrs notice. So, if a patient calls the morning of their appointment and needs to move their appointment and the excuse is not reasonable, rather than simply moving it, the appointment should be broken, then moved. Clicking the 'break' button does two things: it changes the status of the appointment from scheduled to broken, and it makes an entry in the patient account with a fee of $0 which can be changed according to your office policy. The reason for the account entry is so that the patient can see on their bill that you do track broken appointments, and that if you leave the fee at $0, you are doing them a favor by not charging them. Once the appointment has a status of broken, it can be immediately moved to a new location or it can be left in place until you can contact the patient. A broken appointment should be moved before the end of the day, however, so that incomplete appointments do not get left on the appointment book.
An appointment with a broken status can be handled a number of different ways. It can be sent to the Unscheduled list, especially if it is an important appointment with a lab case. Or it can be moved to another date or time by dragging it, just like any other appointment. Once it is moved, it will automatically be set to status 'scheduled'. A final option is to delete the appointment by using the fourth action button, the red X.
Set Complete
The third button is for marking appointments complete. This changes the status of the appoinment to 'complete' and also changes the status of each attached procedure from Treatement Planned to Complete. In addition, the default procedure note for each code is copied into each procedure. The procedure note is where you keep track of the details of the treatment performed, such as materials used, anesthetic, and informed consent. Once an appointment has been marked complete, each procedure should have most of the notes filled in automatically, and the details would just need to be adjusted from within the Chart module. To set up your default notes for each type of procedure, see the Edit Codes section.
Delete
The fourth button deletes the appointment. Only do this if you have made a mistake or if the patient does not want to reschedule. Consider using the unscheduled list button for more important appointments.
Other Appointments
The last button on the toolbar above displays Other appointments for the selected patient. From that list, you can schedule any appointment including the Planned appointment, an unscheduled appointment, a new appointment, or view any appointment for that patient.