Back to Manual Table of Contents
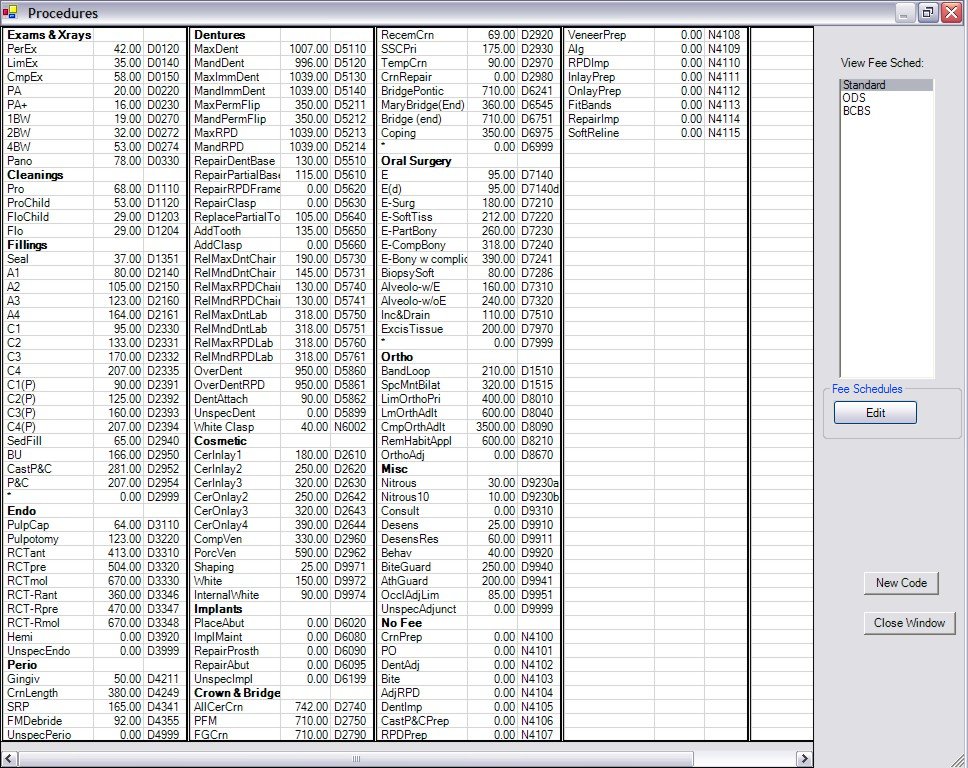
In the Main Menu, click on Lists, then either on View Fees or Edit Codes. This brings up a window that looks like this, the only difference is that when viewing fees, you can't edit the codes. Notice first of all that ALL the procedure codes used in our office can be displayed on one screen with fees. To select a different fee schedule, single click on the list to the right. If you have more fees than will fit on the screen, the scroll bar at the bottom can be used to quickly access them all.
If you are editing procedure codes, a single click on an item in the list will bring up the following window:
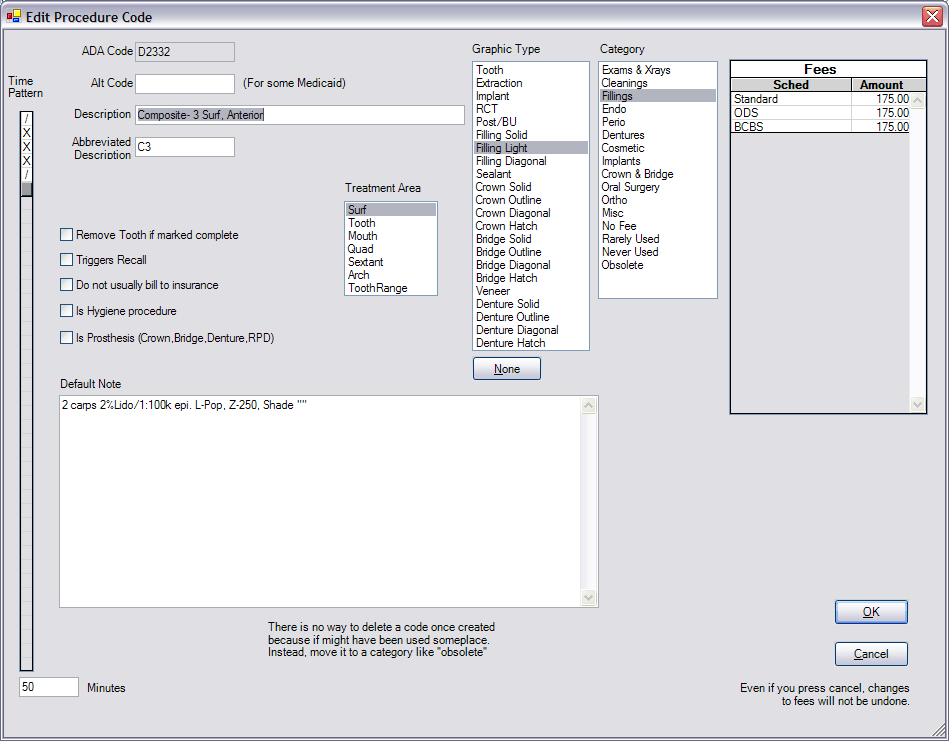
The time pattern is changed by a slider on the left, with slashes for assistant time and X's for dr time. Single clicking on an X or / toggles to the other. The ADACode is not editable. You can start with a new code or edit an existing code, but instead of deleting a code, you should just place it in the obsolete category where it won't get used. Notice that the code may be up to 15 digits. Any code starting with a D will be shortened to 5 characters before being included on an insurance claim. So, for example, you can have two different codes for nitrous with the difference being a letter that is added to the end of a standard ADA code. When sent to insurance, they will look like standard 5digit codes.
You can fill in an alternate code for some Medicaid plans like DentiCal. Instructions on how to set up insurance plans to use alternate codes are in the Ins Plan Types section.
The Graphic type refers to the way a procedure is drawn on the graphical tooth chart in the Chart module.
Depending on which Treatment Area you select from the list, you will have different options when working with that procedure. For instance, if you select Tooth, you will not be given the option for surfaces, but only for a tooth number. Mouth is generic with no extra options. The category list is user definable from the Tools Module in definitions, so the categories you see are might be different than in your office. The default note would be the procedure notes that would normally show in the chart after this procedure was marked complete. For instance, materials used, procedures followed; whatever would normally go in your chart notes. They always get edited at the time of the procedure, but puting them here saves a lot of extra typing.
There are five checkboxes for special circumstances. 'Remove tooth' is for extractions, and would show the tooth as missing in the patient chart if the procedure is marked complete or existing. 'Triggers Recall' is for exams (usually periodic or complete) or possibly cleanings that you want to trigger a new recall in 6 months. 'Do not usually bill to insurance' is for codes other than standard ADACodes, or codes that you don't usually want to get billed to insurance; crown seats, for instance. 'Is Hygiene procedure' lets you automatically assign procedures to the hygiene provider when scheduling an appointment with two providers. See the appointment edit section for an explanation of Hygiene provider. 'Is Prosthesis' causes extra fields to be available in the Procedure Edit window such as previous date and original vs replacement. It also keeps these types of procedures from getting sent to insurance without filling in this information.
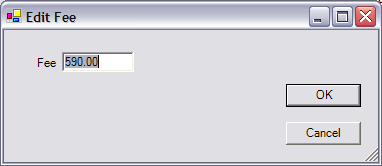
The fees for this procedure code are shown in list to the right. The fee schedules shown are the ones you defined in Definitions. Each procedure can have as many fee schedules as you want (there is no limit). You would generally set up one fee schedule for each insurance company you are contracted with as well as one fee schedule for your Usual Customary and Regular fees. To edit a fee, click once on the item in the list. The following window will be shown:
The default note is the template note which will be copied into a patient's chart each time that procedure is set complete. The usual way of setting a procedure complete is by Setting Complete the appointment it's attached to, although you can also set single procedures complete from the Procedure Edit window. You should enter ahead of time a typical entry including treatment performed, materials used, anesthetic, and informed consent, etc. Once an appointment has been marked complete, each procedure should have most of the notes filled in automatically, and the details would just need to be adjusted from within the Chart module. Additional ways of handling notes are described in the Notes section and the Quick Paste Notes section.
If you enter two quotes without anything between them, like this "", anywhere in your note, then it triggers some special functionality in the program. The default note still gets copied to the procedure note just like always. Then, it is expected that the clinical staff will enter somthing between them. If they forget, then the procedure note is considered to be incomplete. You will see a big red "Incomplete Note" warning above the procedure note, and the procedure will show on the Incomplete Procedure Notes Report. Some examples of where you would use "" would be composite shade, crown shade, denture shade, due date, blood pressure, nitrous levels, etc. Anything you don't want users to forget to enter.