Back to Manual Table of Contents
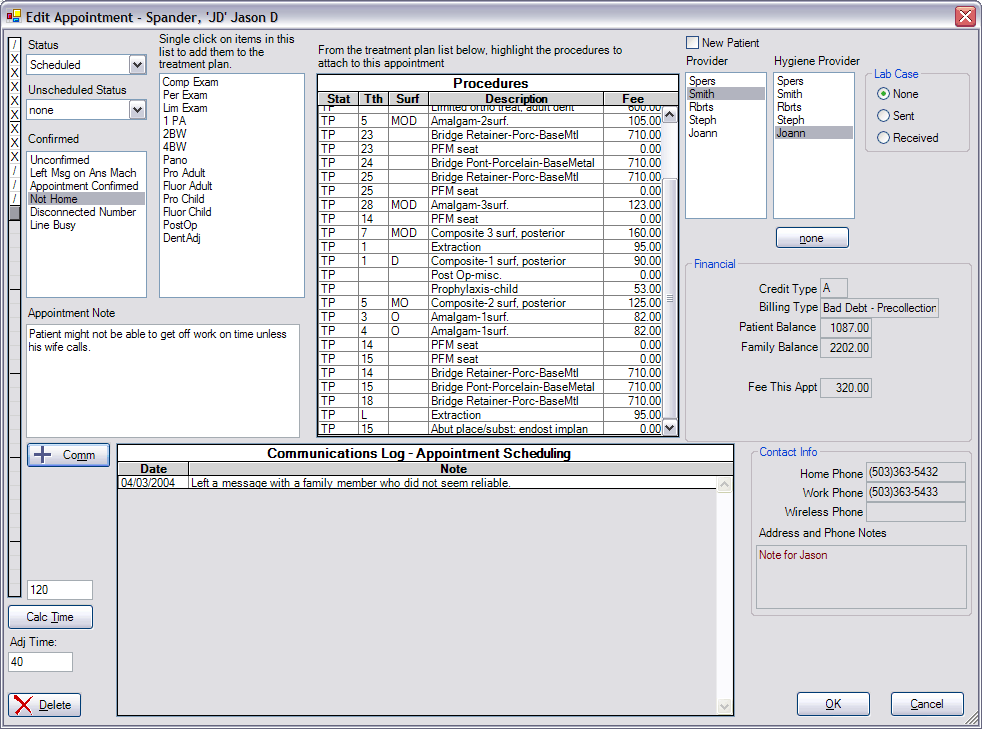
Double clicking on an appointment in the Appointments module brings up the following appointment editing window:
The large procedure list showing in the middle of the window shows the patient's treatment plan along with completed procedures having the same date as the appointment. From this list, procedures are selected to attach to this appointment. Procedures are simply selected by clicking on items in the list to either add or remove them from the appointment. If a needed procedure is not on the list, there are a couple of options. The 'Quick Add' list is very useful when the procedure does not require a tooth number. Clicking on 'Quick Add' adds the procedure to the treatment plan and selects it. The quick add list is set up in Definitions. The other way to add a procedure would be to go to the patient Chart and add it to the treatment plan from there.
The slider at the left is for the time, with the total time also showing at the bottom (120 min). The time needed for the appointment is figured automatically based on the procedures selected, but can be changed using the slider if needed. If the time was changed manually, you can have DentOffice recalculate the automatic time by clicking on the 'Calc Time' button. By entering a value in 'adj time', the automatic time calculation will be adjusted. The time pattern is also shown in the slider. The slash is assistant time, and the X is provider time. Clicking on a slash or an X toggles it to the other.
How automatic time is calculated: Every procedure has a time pattern as part of its definition. See Procedure Codes for more information on setting up initial time patterns. If there is only one procedure selected for an appointment, the time pattern for that appointment is simply the time pattern for that procedure. For each additional procedure, the time patterns are combined following these rules: each additional procedure is shortened by 20 minutes before being added; the first and last time units are removed. For this reason, all procedures should have a time pattern of at least 20 minutes with the first and last unit being a slash. For example, if you had 3 procedures, an MOD amalgam (/XXX/), an extraction (/X/), and a crown prep (/XXXX////), the resulting time pattern would be /XXXXXXXX////, with the first first three X's being the amalgam, the fourth X the extraction, the last four X's and three slashes the crown prep, and the slash on each end standard. If there is a combination of X's and slashes, all the X's are grouped at the beginning of the pattern. If the appointment time needs to be adjusted, the amount of time can be entered in the "Adj Time" box. For instance, if doing two simultaneous crown preps, it would make sense to enter "-40" to shorten the appointment by 40 minutes. For an appointment that is anticipated to be difficult, "30" could be entered to lengthen the appointment by 30 minutes. When time is added or subtracted in this manner, the X's and slashes are kept in the same proportions as the original appointment. If you wish to set the appointment length manually, this can be done by simply dragging the time slider. In this case, you may wish to also put the time into the note section of the appointment so that if someone else accidentally changes or resets the time, you will be able to see what it was originally.
In the status list, the status will be 'scheduled' if the appointment has been scheduled in the Appointments module. It will be 'complete' once it has been marked complete. The process of setting an appointment complete is covered in another section. If you are accessing this window from the Unscheduled list, then the appointment will be status 'unsched list' and will not be present in the appointment book. See that section for more information. The 'ASAP' status means that an appointment is scheduled and is in the Appointments module, but that the patient is available sooner and would like to come in if an opening becomes available. The ASAP functionality will be extended in a future version.
The Unscheduled Status is used from three different areas: the Unscheduled List, Recall List, and Next Appointment Tracker. By changing the unscheduled status, you can easily see why the appointment has not been scheduled and whether to call the patient or not. The items in this list are set up in Definitions.
The Confirmed list is the list that you defined in Definitions. Each item has a corresponding color that will show in the time bar on the left of each appointment. The confirmation can be changed here, but is usually changed directly from the Appointments module screen because it is faster. Either way, you will have the patient's phone number and telephone notes available for easy reference.
There are two lists for Providers. The first is the primary provider which will determine the color of the appointment. Every appointment must have a primary provider. There can also be a hygeine provider. For instance, if an appointment is made for an exam, xrays, and a prophy, the exam can be assigned to the primary provider, while the prophy and xrays get automatically set to the hygiene provider. To setup which procedures will automatically be assigned to the hygiene provider, go to the procedure code editing window. Each code has an option for Hygiene Procedure. If the appointment does not have a hygiene provider selected, all procedures get assigned to the selected provider.
There is a section for entering the status of a lab case to the right. If there is no lab case, you can leave the status as none. If there is a lab case, it will either be sent or received. In either case, the status will show in the Appointments module in the second line of the appointment, right after the patient name. It will say either "LAB SENT" or "LAB RECEIVED". As lab cases come in, the status can be changed from sent to received, so that anyone can easily tell by looking at the Appointment screen whether there are any lab cases that are needed for a certain day and whether they are in. Guidelines on how to schedule procedures involving multiple appointments are in the lab cases section.
The Communications Log is used to track all phone calls related to appointment scheduling. The same list can be seen from any appointment for that patient, including the Planned appointment, and the Recall List. You would not normally make an entry in this list for something as trivial as confirming an appointment. But for most other situations, it makes sense to make an entry here. That way, you can easily see a history of appointments that were rescheduled, cancelled, etc. This also helps so that you don't accidentally call the patient too often to try to get them in for their appointment. If you call a patient repeatedly who has already indicated that they wish to wait for some reason, then you would risk losing that patient. And similarly, if a patient says that nobody called them for their recall, you will be able to tell immediately whether that is true by reviewing the phone call history.
If this is a new patient who has never had an appointment before, then check the New Patient box at the upper right.