Back to Manual Table of Contents
The patient information area is in the upper left corner of the Family module. Double click in that area to open up the following window:
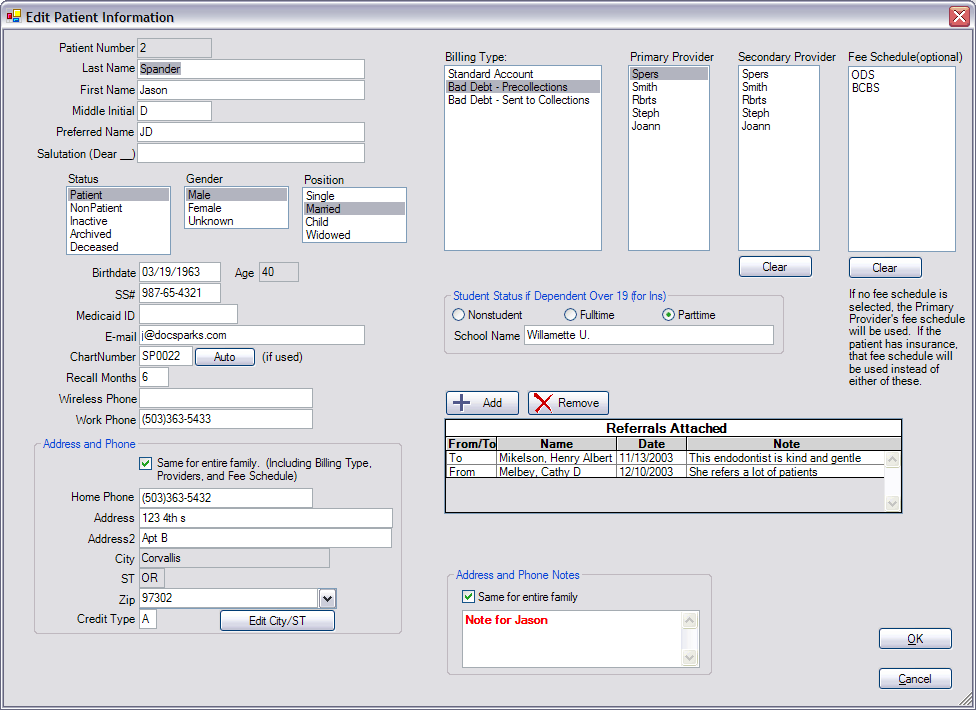
The Patient Number is assigned automatically by the system. It is shown here for reference. The name information is entered at the top. The preferred name will show in most areas of DentOffice before the first name for easy reference. The salutation is not actually used anywhere, but might be useful for offices that do letter merge. The status of the patient will usually be "Patient" unless the patient is simply in the computer for reference and not really a patient. Examples of this would be the parent of a child, a guarantor, or an insurance subscriber. These types of people need to be in the computer whether or not they are actually patients. Once a patient is no longer active, as determined by your office policies, their status may be changed to "Inactive". If a patient is definitely never coming back, their status may be changed to "Arhived", or "Deceased". Inactive, Archived, and Deceased are all considered inactive when in the Select Patient window. There is also a hidden status called "Deleted" which is assigned when you delete a patient. The patient will no longer show anywhere in the program and the integrity of the database is maintained. The gender "Unknown" is only for HIPAA compliance, in case a patient does not wish you to record or track their gender.
The age is generated automatically based on the birthdate, so it cannot be edited. The Chart Number is optional. In fact it is recommended to not use it unless you have to. One possible reason why you might need to used chart numbers is if you converted from another program and you need a place to put the patient ID number. Or, if you actually do put numbers on your paper charts, then you would also find this useful. The Auto button is currently set up to assign the next available numeric chart number to the current patient. It will not work for mixed letters and numbers. The only place the chart number will show is in the Family module
The Recall Months box is important. It is the interval between Recall appointments for this patient. The default is 6 months, but may be changed to any value. Wireless and Work phone numbers will automatically format as you type in the numbers.
The Address and Phone section contains all the fields that are normally the same for an entire family. You would normally want to keep the 'Same for entire family' box checked so that whenever you change this information for one family member, it will also change it for the other family members.
Credit type is a one letter code that your office may use to track the credit worthiness of patients. You can base this on credit reports, history of payement, or whatever criteria you prefer. One suggested method is using A, B, or C. If their credit is unknown, you can use a 0. In any case, these letters are simply for your information and are not used internally by the program. The letter displays prominently in the Appointments module at the upper left of each appointment, as well as in various other useful places throughout the program.
The City and State fields are not editable except as part of a zip code. You would normally enter in a zip code and then the City and State are filled in automatically. See the Zip Code section for more information on how to set up and maintain zip codes. Your frequently used zip codes will be available in a drop down list accessible by clicking the arrow to the right of the zip code box. You can select one from there, or type one in manually, or click the Edit City/ST button for more options. This feature speeds entry and prevents misspellings. If you don't know the zip code, but need to type in a City and State, you can enter, for example, a question mark in the zip code field, and then it will let you enter the City and State.
The Address and Phone notes can be used to make notes about when to call a patient, which number the patient prefers, extra phone numbers, extensions, bad phone numbers, bad addresses, alternate addresses, etc. It can be longer than 4 lines, but only the first 4 lines will show in the family module and you will have to scroll down to see the rest. These notes also show in various places throughout the program where it is useful to see notes about address or phone. These areas include Unscheduled list, Recall list, and the Appointments module.
The Address and Phone notes can also be the same for the entire family so that you don't have to keep typing in the same information. Before checking the box, however, you might want to take a look at what is in the notes section for the other family members so you don't accidently overwrite another note.
Billing types can be set up in Definitions. See the Providers section for information on how to set up your providers. There should also be a default provider for the Practice. The Primary Provider is the dentist who usually sees the patient. You can also optionally specify a secondary provider which is usually the hygeinist. The Fee Schedule names can be set up in Definitions. Small offices can generally leave it blank. The student status is only used for insurance claims.
This is also where you add Referrals to a patient. See the Referrals section for detailed information on how referrals are added and organized. The first referral source on this list with a status of From will be the referral that shows in the Family module.
When done, click OK. Any errors will show similar to this:
![]()
All errors must be fixed before you will be allowed to save the changes.