Back to Manual Table of Contents
You have four ways of getting images and other documents into the Images module.
Scanning
The first is by scanning them. Click one of the scan buttons to bring up the following
window:

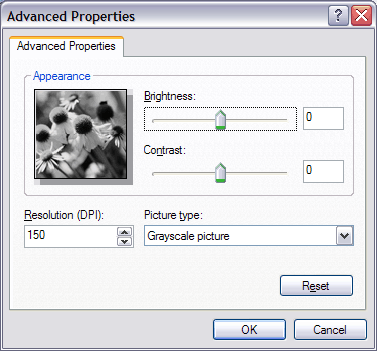
We recommend that you choose Custom Settings and use the following guidelines to minimize the disk space that each document will require. The first time you scan, you will have to set the Custom Settings by clicking on "Adjust the quality of the scanned picture" at the lower left. A window similar to the following will come up:

The recommended settings are as above; 150 dpi, grayscale picture. After setting it up, you will not have to set it up again each time you scan. At each scan, you have to select custom settings from the first window and then click the scan button. Clicking the preview button would simply make each scan take longer since the scanner would have to scan twice. After clicking scan and waiting 10 seconds, the image should show in the Images module and the document info dialog will let you enter a description and change the category.
Then the auto crop feature selects a crop rectangle. You can accept the displayed crop region, or you can later manually crop. When the image is saved, it is converted to a jpg format and is compressed to save disk space. You can set the amount of compression for images from the Main Menu. Under File, select Scanner:

Importing
The second way to get images and documents into DentOffice is to import them
from an existing file. At the moment, you can only import them one at a time. If you want to import a group of files, see the last section on Folders.
Click the import button to bring up the following window:

Find the file you want to import, and click Open. The image should show in the main window. The file does not get compressed when saving.
Paste From Clipboard
The third way to get an image into the Images module is to paste
from the clipboard. The first step is to copy something to the clipboard in
the first place. There are many programs that will let you copy an image to
the clipboard using the standard Edit | Copy feature. Also, a very useful technique
is to activate a window that you want to copy, and press Alt-Prnt Scrn (the
Prnt Scrn button is usually located at the top of the keyboard above the arrow
keys. That key combination places a snapshot of the current window onto the
clipboard. Then, go to the Images module and click Paste from Clipboard.
When saving a pasted image, the file is not compressed, but generally only takes
up 1/4 the space of a scanned document. This is currently the recommended technique
for saving treatment plans for archival purposes.
Also, see the PrintScreen tool section for
details on printing screen shots that you do not want to save with any particular
patient.
Copy Into Folder
The last way to attach an image or other file to a patient is to simply copy it into their folder. For example, let's say you copy two files called Letter.doc and Picture.jpg into the folder called \\Server\OpenDentalData\S\SpanderJason2\. Then, the next time you open the Images module for Jason Spander, the two files will be automatically recognized and added to the tree view. From there, you can recategorize or rename them. This can be very powerful because it means you can copy large quantities of files into any patient's folder. Just keep in mind that once they have been recognized by DentOffice, that you should not rename or move them or DentOffice will not know where to find them.