Back to Manual Table of Contents
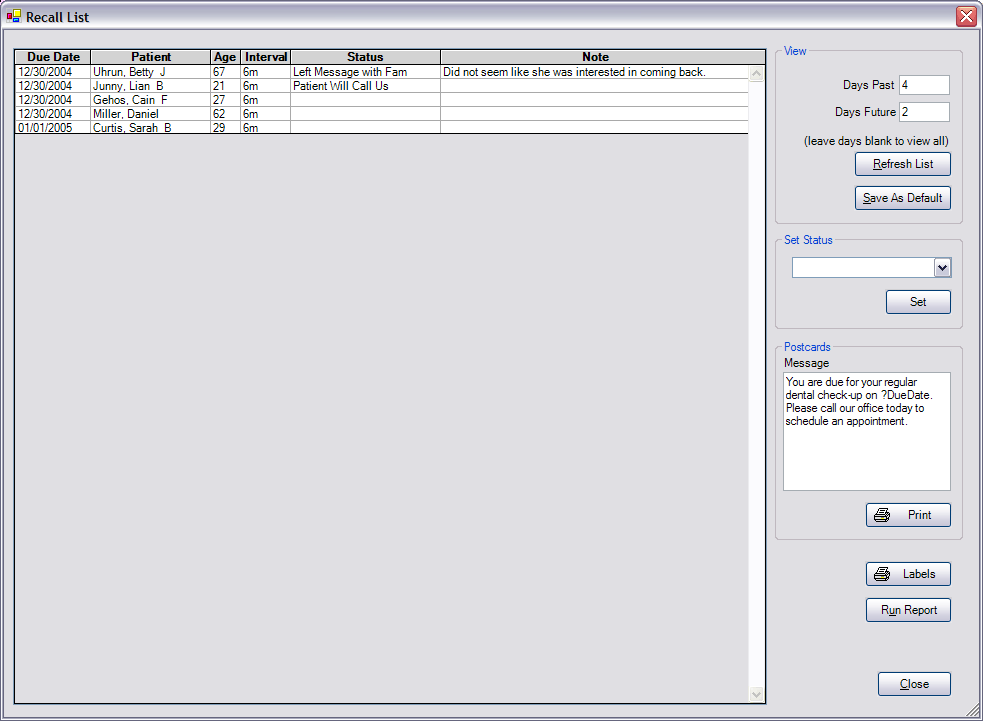
In the Appointments module, in the toolbar in the upper right corner, click on Recall List.

This is a list of Recalls with due dates that match the values set in the View section at the upper right. You would typically go a few weeks into the past and a few days into the future for the timespan. The recall list should be run every day and every patient on the list should be reviewed and called. Each recall has a status in the middle column which can be updated by highlighting the rows in the list, then selecting a status at the right and clicking Set. But usually, you would change statuses one at a time by double clicking on a row.

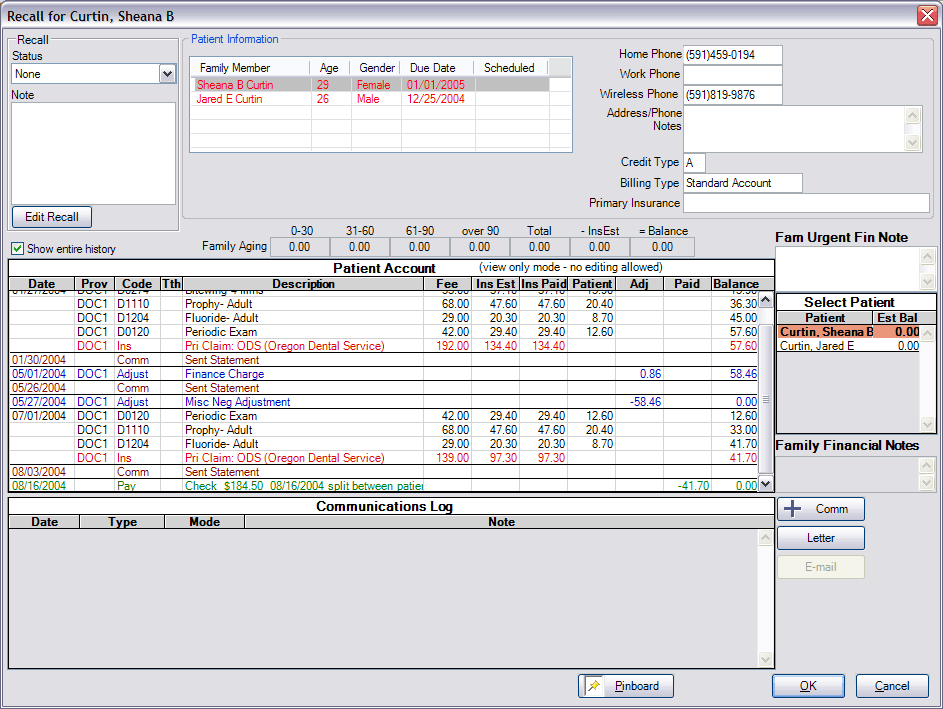
You will notice that the bottom half of this window is a read-only version of the patient Account module. Also at the top of the window is patient information that might be useful. By reviewing the patient account, financial notes, credit type, and address/phone notes, you can get a much clearer picture of what kind of patient you are calling and what special needs they might have.
You would typically go to the box at the upper left and change the status and the note for the recall. Then, when you click OK or Pinboard a Comm Log entry will automatically be created with the changes. It is important to have a Comm Log entry for every phone call so that you have a record of every attempt to contact the patient. If you leave a message on the answering machine on the first call, you might continue to try to contact them without leaving multiple messages. If they don't have an answering machine and you cannot contact them, you can always send them a postcard and change the status to reflect that. All statuses for the practice can be set up from the Definitions window. If you want to edit the recall due date or interval, click on the Edit Recall button at the upper left.
If a patient is ready to schedule an appointment, simply click the Pinboard button to place a recall appointment on the pinboard. The program automatically adds the necessary procedures to the treatment plan and attaches them to the appointment. It also handles whether or not to include bitewings based on the defaults you have set up in the Recall Setup window.
Back on the main Recall List page, you also have the option of sending postcards in the section at the lower right. The message is customizable. It's initially set up from the Recall Setup window, but can also be changed here just before sending postcards. Highlight the recall items in the list before clicking Print.

The example above is for 3 postcards per sheet, but you can change this in Recall Setup.
Just below the postcards section, you can similarly print address labels on a standards sheet of 30.
The Run Report button is for situations where you might want even more control.

You can select exactly which fields to include in your report, and send the resulting data to a simple text file. From there, you can merge it with any Word template to print your own customized postcards, letters, etc.