Back to Manual Table of Contents
When you receive payment from an insurance company, it will come with an EOB (Explanation Of Benefits). It is common for the insurance company to combine multiple patients on one EOB and send one check to cover all the claims. DentOffice is organized so that you first enter the payment amount for each individual patient, and then you create an insurance check that includes all those splits. So, you first go into each patient on the list, double click on the appropriate Claim in the Account module, and enter the payment. See the section at the bottom for how to create the check.
Payments can be entered by total amount or itemized by procedure. There are many advantages to itemizing by procedure and that is the method that is strongly recommended. At the upper right of the Claim window are three buttons in the Enter Payment section: Total, By Procedure, and Supplemental. As explained in the Claim Procedures section, all payments are tracked as claim procedures, whether they are itemized as part of an existing dental procedure, or entered as a completely separate total payment.
If you click the Total button, it creates a separate Claim Procedure. This payment is attached to the claim, but not to any particular procedure. Enter the amount insurance paid and click OK. Note that you must still create the check as described in the section below.
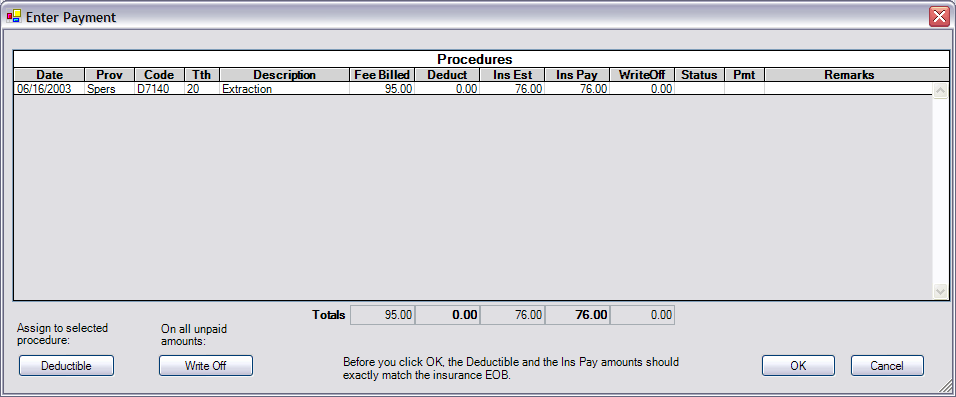
If, instead, you click the By Procedure button, then this window will come up with a list of the procedures and a total at the bottom. If you want more control over which procedures to bring up, highlight some procedures first. The totals at the bottom for the deductible and for the insurance payment should exactly match the EOB.
You can double click on any of the procedures to edit the amounts. See the Claim Procedure page if you need help with understanding how to edit the amounts. The deductible can be edited from within the claim procedure edit window, or if you need to apply it to a different procedure than the one it was estimated for, then highlight that procedure and click the Deductible button. Make sure to fill in the remarks field for any procedure that has a remark on the EOB. Since the insurance paid amount is filled in for you when you follow the instructions above, there is usually very little editing that you will have to do and it should go fast. By entering the information in as described, you can file the EOBs, and you will never have to refer back to them again. All the information you need will be present in DentOffice from any computer if a patient calls and complains that insurance did not pay as expected. You will be able to see why they didn't pay, and exactly which procedures were not paid on.
Creating the Check
After entering the payment amount for each patient, it is time to create the insurance check that combines all those payments into one. Of course, this same process also works if the check includes payment for only one claim. Open the Claim window for any of the claims that the check is paying on. In the lower middle of the claim window is a button labeled Create Check. Clicking on this button brings up the following window: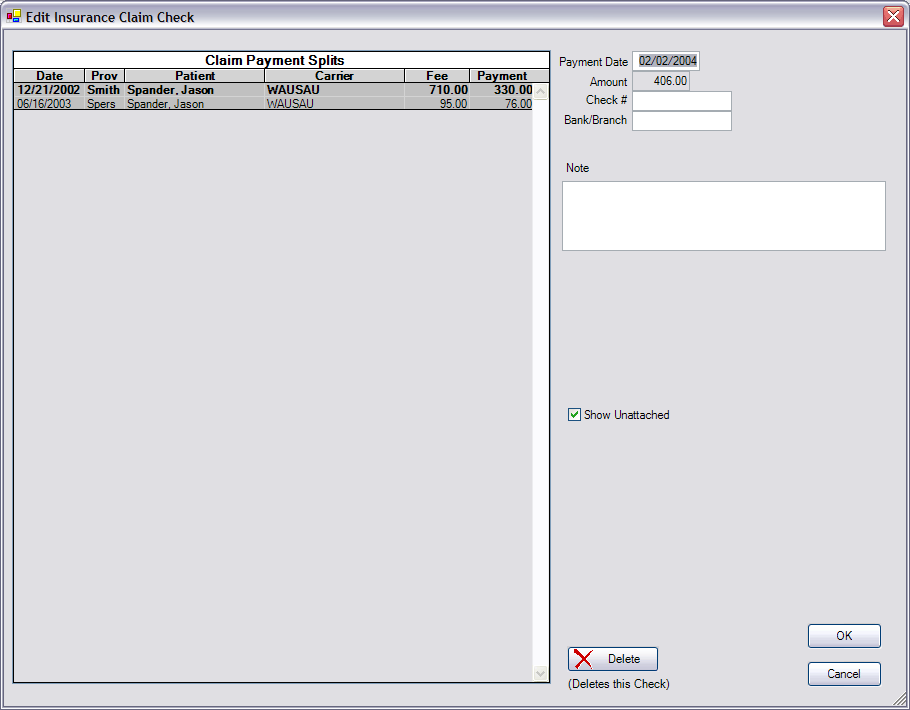
All insurance payments for all patients that have not been attached to an insurance check will be shown in the main list. Generally, the list will only include the payments you just entered because all other payments will already be attached to other insurance checks. You can change which payments you want to include in the insurance check by highlighting or unhighlighting items on the list while holding down the Ctrl key. Notice that whichever claim you were in when you opened this window will show on the list in bold. The total payments for selected items on the list must match the total amount of the check. The payment date should be today's date because that is the date that will show on the deposit slip. If you delete the check from this window, it does not affect any of the payment splits. They will simply remain unattached until you create a new check. When you are done, click OK to close this window.